Operational Instructions
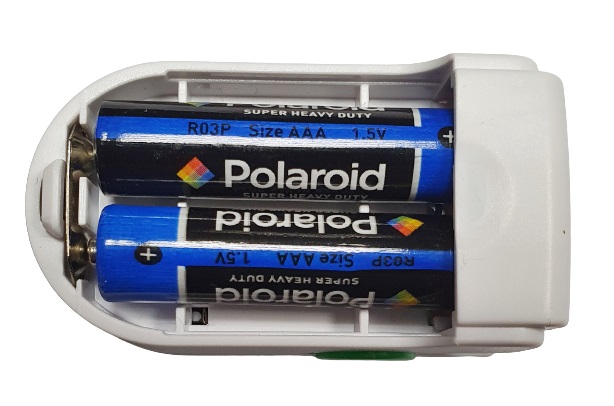
- Install a pair of AAA batteries into the battery compartment.
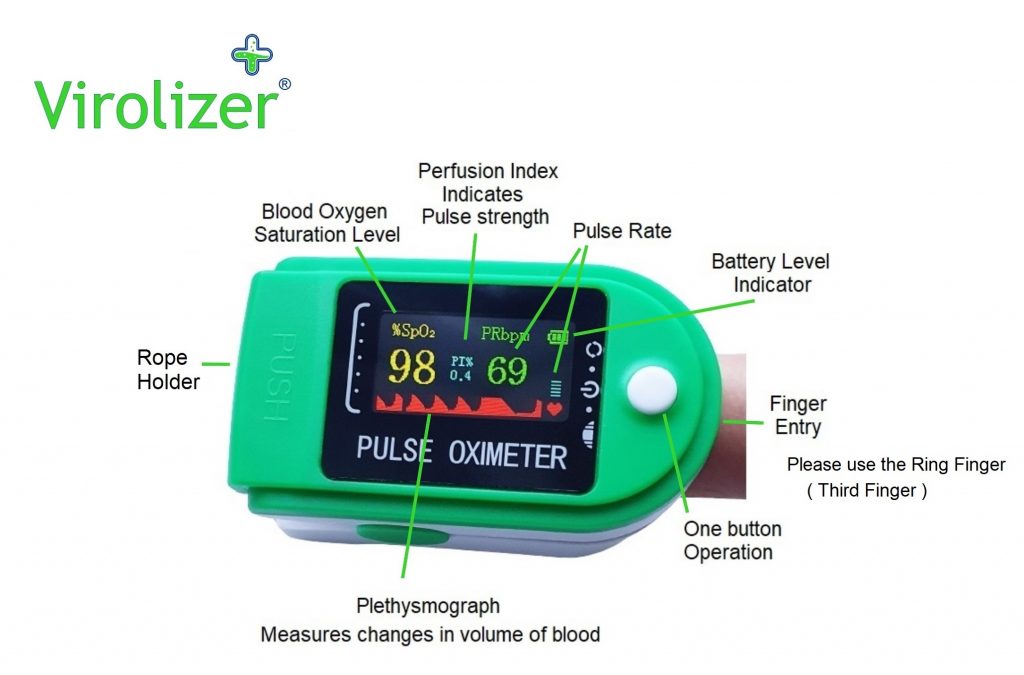
- Place a finger into a rubber hole of the Oximeter.
- Press button on the front panel to start.
- Do not shake your finger or move your body when the Oximeter is working.
- Press the button if you want to change display direction.
- Read the relevant value from the display screen.
- The device will automatically power off in 8 seconds if there is no finger signal. When plugging your finger into the Oximeter, your nail surface must be upward. Please use Virolizer alcohol spray to clean the rubber before each test and clean the testing finger. (The rubber inside the Oximeter is non toxic, causes no harm, and brings no side effect such as allergy to the skin).
Virolizer Oximeter Problem Solving Guide
- Oximeter has no display light
Check your batteries some brands of batteries have altered there positive end design to make them smaller. This leads to non-contact between the plate and the battery in many items.
- Oximeter not Reading after scan
There could be a number of reasons for initial calibration failure.
Firstly the Oximeter may be in a very cold environment or the fingertip may be very cold this will require a number of attempts taking your finger out and then in again once sync the readings will appear.
Peoples finger sizes vary, its recommended to use the third finger as a better fit.
After scanning if the sensor is unable to record a satisfactory data reading it will auto switch off to conserve the battery. The Auto switching off will stop once the sensor has successfully calibrated.
- The battery case at the back does not close.
Check battery positions then press and slide and it will close do not press too hard at an angle or the cover may snap. Positive and negative side by side.
- The reading seems too low
Medical Oximeters used in hospital that have 4 sides spring loaded and connected with wires to a monitor. You will have to work out what finger and position of your hand suits you also if you have been sitting or active will read different results after a few uses and testing on another member of the family or friend you will ascertain what position will give you a good reading for future use. Also after a few uses the sensor will becoming consistent.
- Cleaning instructions
We recommend you clean and use Alcohol wipes/spray on the device to keep it germ free (not provided). We recommend purchasing a Virolizer Spray which will evaporate on digital devices leaving the device clean.
- Medical device
We recommend always to consult a medical professional for a second opinion if you have doubts or need reconfirmation of the readings. This product does not replace a medical device.
We recommend cleaning using the Virolizer Spray leaves product clean and dry.
Please note: Sometimes Raynaud’s disease affects readings and renders of oximeters inaccurate
Detailed Descriptions of Product Functions:
1. Display Type: OLED display
2. Sp O2: Measurement range: 70% ~ 99%
Accuracy: ±2% on the stage of 80% ~ 99%;
±3% on the stage of 70% ~ 79%;
Below 70% no requirement . Resolution: ±1%
3. PR: Measurement range: 30BPM ~ 240BPM
Accuracy: ±1BPM or ±1% (the larger one)
4. Power consumption: 2 x AAA 1.5V alkaline batteries – below 30mA
5. Automatic power-off: The product power off by itself when no finger is in the product for ≥8 seconds.
6. Operation Environment:
Temperature: 5°C ~ 40°C – Humidity: 15% ~ 80%
Atmospheric pressure: 70kPa ~ 106kPa
7. Transport, storage environment:
Temperature: -10°C ~ 55°C – Humidity: ≤95%
Atmospheric pressure: 50kPa ~ 106kPa, non-corrosive gas and well-ventilated environment
Diagram of Operation Principle
1. Infrared-ray receiving tube
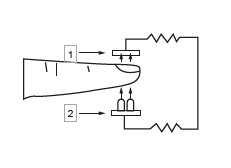
2. Infrared-ray transmitting tube